Congratulations to NASA for landing its latest Rover successfully on the surface of Mars.
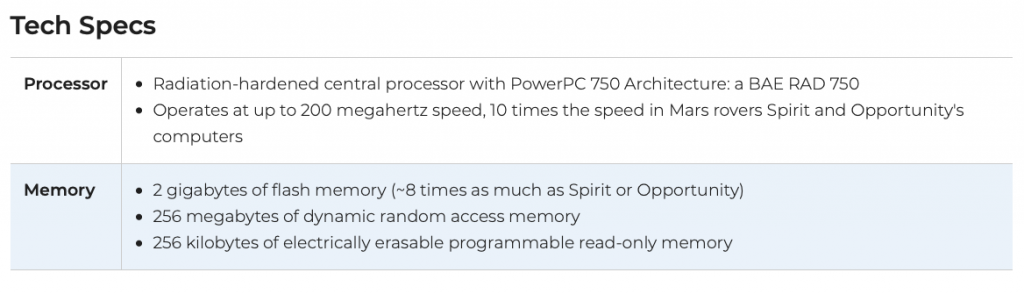
I found this bit of info on Twitter today, but the Rover runs on a 200 MHz PowerPC CPU. I found it fascinating for those of us who still get a bit of use out of our old PowerPC tech. So does NASA, apparently.
As our Power Mac G5s and other PowerPC Macs age rapidly, our machines are trapped in time. We can count on one hand, maybe two, the amount of software packages that are still being actively maintained and updated for our hardware, including the valuable TenFourFox. Of course, it’s not the end of the world to use dated but perfectly functional software to write our papers, design websites, create graphics, and so on, but getting our PowerPC Macs online in a secure and functional way with the complexity of the modern web gets trickier each year.
Don’t forget that Leopard (Mac OS X 10.5) received its last security update… a long time ago.
Wouldn’t it be nice to tinker with modern up to date software in a more secure operating system?
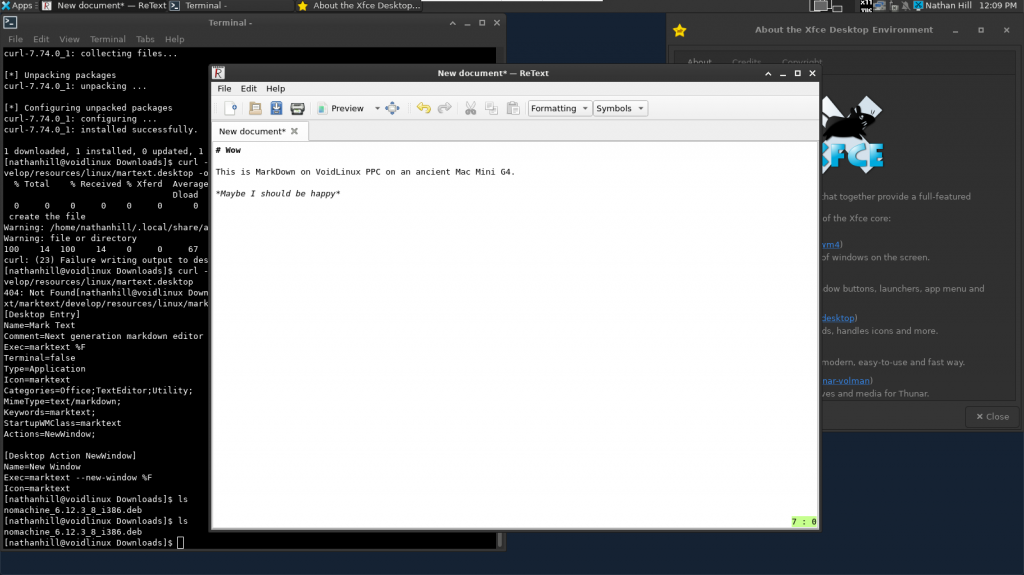
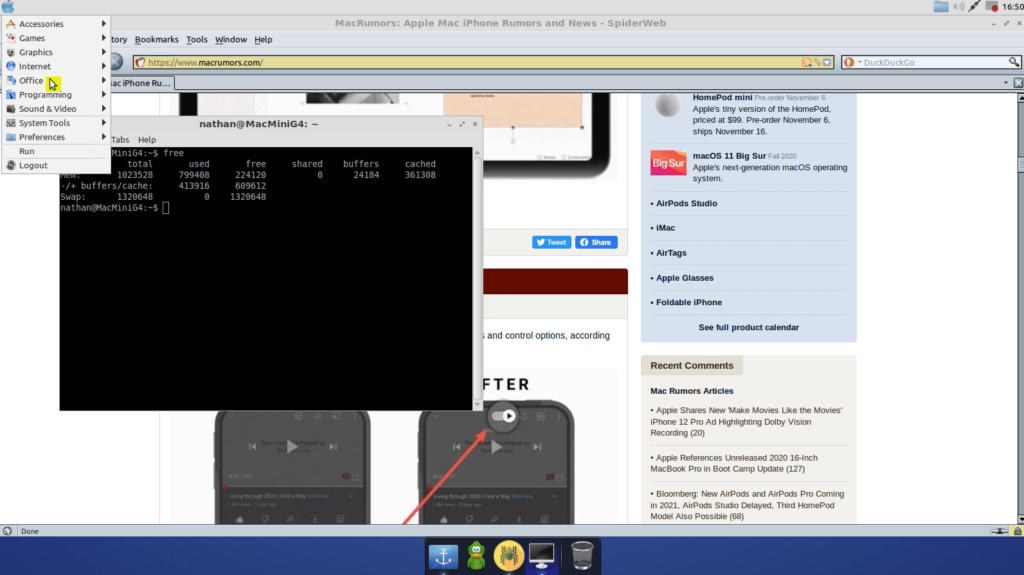
Say hello to Void Linux for PPC, pictured above running on my Mac Mini G4.
What is Void Linux?
Void Linux PPC is an up to date, community-led Linux-based OS. The distribution is not official but driven by a dedicated group of developers using Void Linux as its base. The main target and energy around the distribution focuses on newer PowerPC machines, including Raptor’s Blackbird line of motherboards and machines, but our older PowerPC Macs are supported, including install instructions and well-organized tips and tricks to get started.
In the larger picture, Void Linux stands out due to its own package management system called xbps, and per the main distribution website, it emphasizes stability over a rolling release. However, packages are frequently updated. For example, when the newest XFCE4 desktop environment was released on December 22, I was able to update to the latest and greatest XFCE4 as of January 1. The most recent kernel version is 5.9.16_1, which is so cool to run recent Linux kernels on such old hardware.
As I highlighted in my brief look at MacBuntu several weeks back, you can make a strong argument that older machines should stick with software from its period just for speed alone, but it is cool to be able to use more recent Linux kernels, desktop environments, and other open source applications on your ancient Mac. Performance, while not blazing fast, is quite solid.
Another area that makes Void Linux unique is that it supports both musl and gnu libc implementations of the standard shared Linux library. These are the libraries that serve as the common foundation for many core Linux software packages across various distributions. MUSL is intriguing for PowerPC users because it is newer and “cleaner”, but gnu libc is more popular and benefits from years of optimization. There is one other added bonus – libc works better with some hardware drivers, especially proprietary gpu drivers. I ended up going with the libc version as it avoids a couple of GPU bugs on my ancient Radeon 9200 GPU in the Mac Mini. You can read about GPU compatibility with Void Linux PPC on this handy chart.
The PowerPC distribution also has a quite thorough number of software packages available for install, though it appears that the number fluctuates as some package updates require fixes to be able to build properly on our old Macs. I know there were a few software packages I couldn’t find during my test run, but most things I needed are available in one form or another. You can poke through the list of available packages here.
What is the install like?
Install was relatively straightforward. Using a USB flash drive, as my old DVD drive in the G4 died years ago, I booted into a basic Void Linux PPC environment, typed in void-installer, and made my way through the process. The website offers an excellent step by step tutorial, including tips to make sure your hard drive is properly formatted, even in the case where you might want to still be able to boot into Mac OS X. My first major issue during installation was getting my internal SSD to partition and format. No matter what I tried, my partition map came out all wrong. I ended up flashing the install image to the USB drive a second time. For whatever reason, it worked. No idea why. (Hint: Be ready for these kinds of strange experiences with Linux from time to time.)
After the install, you are greeted with a login prompt, which is perfect if you want to run your Mac Mini as a server. Then you can begin updating the package manager and core packages using xbps-install -Su and building the environment you are comfortable with. Various desktop environments and window managers are available. I prefer XFCE4 for its flexibility, style, and ability to get out of the way. Plus, it’s pretty light. There are lighter and beefier options available though.
The install was the first part of the process – what can be time consuming and head scratching is that next step of hunting for software packages that will fill your needs. I have experience with other distributions, so it was a little frustrating to have to hunt for the right package name since it could be named differently in Void Linux. Nonetheless, with patience and a few google searches, I was able to begin building the environment you see above. Sure, there were bugs along the way, like how sudo xbps-install xfce4 didn’t include all the packages I really needed. Luckily, fellow users in the voidlinuxppc channel on Freenode were able to help. Great people!
ReText, XFCE Terminal, and About XFCE4 in Void Linux PPC
How is it on the internet?
Unfortunately, web browsing is a slight challenge.
One webkit-based browser available on Void Linux PPC is Epiphany, though you will need to type in an EXPORT command listed in the Frequently Asked Questions page to make sure it renders webpages the correct way. For me, it lags and wasn’t very reliable.
I was able to install the ArcticFox PowerPC Debian package with minimal fuss, and it works great. However, Arctic Fox is an older build.
Of course, you can also use some command line web browsers as a backup plan.
As some good news, I recommend following the work of Jake Hamby who is seeking to build more recent versions of FireFox for PowerPC Linux. May his efforts bear fruit soon!
Beyond web browsing, you can easily ssh into your favorite servers, download multiple IRC clients, and use your Mac as a server. I am accessing it over x11vnc too, and the performance is decent on my personal network. The nice thing is that I know security updates are constantly on the way for both internet facing applications as well as the core software in the distribution. That’s really cool.
Could it be a daily driver?
Sure. Some apps are just as speedy and functional, if not as pretty, as many Mac OS X Leopard variants. For example, I’ve switched from XChat to Quassel for my preferred IRC client. Both options work great. LibreOffice should be available, though I’ve installed AbiWord for now since it is lighter and I’ve never been a fan of LibreOffice. Another app that seems promising for coding and text work is Geany. A workable Markdown editor is ReText, though I wish some newer and better looking options were available.
And really, I’ve just started scratching the surface of resources of available packages for install.
For developers on these old machines, you’ve got a variety of options to tinker with, including Python3.
Best of all, you can configure Void Linux PPC to your liking. XFCE4 in particular can be made to look very Mac-like, and there are a plethora of themes available to give you dark, vintage, or minimal styles.
But what are its downsides?
In addition to some general frustrations and a learning curve that could scare off some users, Void Linux PPC has the same challenges that all Linux distributions face – hit or miss hardware support, lack of polish, software that can be functional but look like crap, lots of error messages that require googling to figure out how to address, and a general non-user friendliness.
You will definitely miss some of your favorite software packages from the Mac world.
Mac OS X is simply beautiful and optimized for our Macs. Going to Linux, where most of the desktop environment has to run without any hardware optimization, is jarring. I think Linux could be better optimized, but who is going to hire developers to target hardware as old as ours? There are plenty of cases where new PC hardware doesn’t run well in Linux. It’s simply the nature of open source software. People spend time focusing on what they are passionate about, hardware support requires buy in from hardware manufacturers, and these old PowerPC machines are only on a few people’s radars anymore.
Case in point, I spent a few hours working to get a compositor going with XFCE4. The default compositor should be turned off immediately for a little better performance, relying on software rendering rather than hardware rendering. Another option is the venerable compiz compositor, but though it is available in the repositories, enabling it means an instant freeze and hardware crash. It would be nice to have even a minimal compositor to get better performance out of window draws and refreshes for a more pleasant desktop experience. (Maybe a dash of transparency wouldn’t hurt.)
The other challenge is your need to search Google frequently or reach out for help to sort through bugs that really shouldn’t exist. On one hand, some of these bugs are ignorable. For example, I received a constant PolicyKit error when launching XFCE4 for a while, until I found the other dependencies XFCE4 was looking for, including a window manager to load on launch. The error didn’t affect the operation of XFCE in a show stopper way – just annoying. XFCE’s included Power Manager didn’t work as well, exiting with an error, until I installed some other missing components. Fixing these issues wasn’t intuitive, since the PolicyKit error or PowerManager error tell you nothing about next steps.
Part of this comes from the design of Linux to have the ability to install just what you need. For a server or a secure environment, that makes sense, but for desktop environments, why not install every component, even alternative components like themes, to save the user time and insure a smooth experience? Just because the component is installed, it doesn’t mean the user will have to configure it or even run it. And while I can hear the argument that learning to tinker and solve problems is a win, it’s not really. I don’t think I will have any other moment in my life when I need to know how to fix PolicyKit errors in Linux.
Just be ready when entering the world of Linux to know that there will be issues, and you will need to take some time to get the optimal environment/setup that works for you. Do your best not to give up, and keep in mind you can always start over.
Conclusion
Ultimately, I like Void Linux PPC and recommend it for PowerPC users who want to move to an operating system that is still getting software updates. Since I already have Leopard going on my Power Mac G5, I’m excited to continue to tinker with my Mac Mini G4 and see what I can do with it. I found the documentation on the website as well as the MacRumors thread and VoidLinuxPPC IRC channel helpful resources to learn more and get feedback. That’s a good sign.
There are challenges – you will need to be prepared to roll up your sleeves and do some proactive tinkering to get things fully working. Linux may not be for you, and that’s okay. But it is a great option to keep our PowerPC machines rolling into the void of uncertainty that is 2021 and beyond.
When my father died this past summer, my brother and I picked through a garage and house full of vintage Mac gear that he had collected. We hope to share it with the world eventually… and of course hope it still works. Two of the coveted pieces that we grabbed for our own play and memory sake were Color Classics.
If you don’t know the story of Color Classics, these were in the same form factor of the much beloved compact Macs like the Classic, Classic II, and SE/30, but they introduced a color screen. They were designed to be home or education Macs, affordable packages, but in order to get under budget or make them less likely to compete against more robust Macs, the computers introduced a bunch of design choices that made them poor performers. Were they fine for some basic tasks? Sure. As the internet age dawned, these Macs struggled to keep up.
For example, the Color Classic motherboard featured a 32-bit processor on a 16-bit data bus.
This meant RAM expansion was crippled – just a whopping 10 MB of RAM available when maxed out.
I’ve got my Color Classic running after a recap and battery replacement, and it’s true. It’s slow. It’s limited.
A bunch of Classic owners go and upgrade them with other motherboards, and I may do that someday but there is something about having a stock machine working that is just fine.
All of that brings us to the introduction of new Silicon based Macs, the next transition after Apple left behind PowerPC Macs for Intel Macs years ago. While we want to do apple to apple comparisons, these new Macs are different. In some ways, they represent changes in design brought upon by all the needs for smaller, efficient computers in various packages, from smartphones to smart TVs. These new Mac motherboards don’t resemble the Intel and PowerPC boards of old approach, where you wanted to max out RAM and add in expansion cards to get better performance. These new Macs apparently are simply more efficient with that integrated design, meaning that some of those old school paradigms about RAM and video are going to go by the wayside.
I invite you to read this new roundup of reviews to get a glimpse of what people are saying.
Computers need to change. The days of Apple hobbling products to boost sales are long since over. Hopefully, the days of “budget computers” are also over, like when a website sells a computer with a processor promised to be “reliable”. Hopefully, this shifts computing more into the favorable direction of consumer’s budgets, meaning even an 8 GB machine becomes powerful enough for 99% of the people to do content creation and more.
Of course, I’m not jumping on board to buy one of the new M1 Macs right away. I’ll wait and see, first, and look to future products and the maturation of this platform. It’s an intriguing time to see how this impacts the computing landscape.
Meanwhile, I’ll keep tinkering on my vintage Color Classic and venerable PowerMac G5.
If you are looking to extend the life of your G4 or G5 PowerPC machine, open source software is a valuable tool for interesting software packages that can provide better security and breath some life into our aging computers.
One of the Linux variants that is available for PowerPC Macs is Lubuntu-Remix.
You won’t find this one on the official Lubuntu pages, because it is maintained by “wicknix” over on the MacRumors forum. He provides a few different versions, including one that is based off of Ubuntu 16 and works better on G5s. The one I have been utilizing to test some things out is MacBuntu, based off of Ubuntu 12 but with some newer software packages and more modern web browser options. Oh, and a shiny little bit of Mac friendliness like a faux Dock.
As you can see from the screenshot, MacBuntu is functional and provides some nice software options right out of the box (including ArcticFox pictured above). You will need to pay attention to your boot options, as Linux on PowerPC machines often requires making some adjustments to the boot string to make the GPUs function correctly. Without doing so, the system will likely lock up. There are helpful guides in the thread, and wicknix does a great job answering questions from newbies.
In the screenshot above, I am running MacBuntu on an old Mac mini G4. It doesn’t take too long to boot into the desktop, and it is decently responsive. You can browse the web, although webpages are fairly slow to load. Using terminal is of course nice. I also enable a vnc server, so I can remotely log in and tinker with it a bit. Ultimately, it works, and it’s something nice to mess with on a machine that is old and is limited to 1GB of RAM. Keep all that in mind as you tinker with it.
The other challenge is figuring out ways to load the OS in the first place since using a CD/DVD is likely the friendliest solution, but in my case and many others, the old slot loading CD/DVD drives in these PowerPC machines have reached the end of their life. I ended up just pulling mine out, so I was able to get the G4 to boot off a flash drive. It took some trial and error though.
I won’t say that it is as pleasant to use or speedy as a Leopard or Tiger install. It certainly isn’t as fast as OS 9 (which you can install on these old G4s). But since some of the software is newer, it is a nice alternative to throw in the mix and tinker with.
As our old PowerPC machines age, especially our G5s, browsing the internet is still possible because Cameron Kaiser is a gift. Kaiser in turn single-handedly dives into reams of code to keep TenFourFox updated and lively, including new features like “sticky reader mode“.
Ads and tracking stuff definitely slow down web browsing for all PCs, so more and more people have switched to using their browser’s built-in ad blocking systems or plugins like Wipr or uBlock. (Cameron has directly embedded an ad blocker on TenFourFox, which does help pages load quicker.) But the good news is there are alternatives that reduce the rendering load on our old Macs.
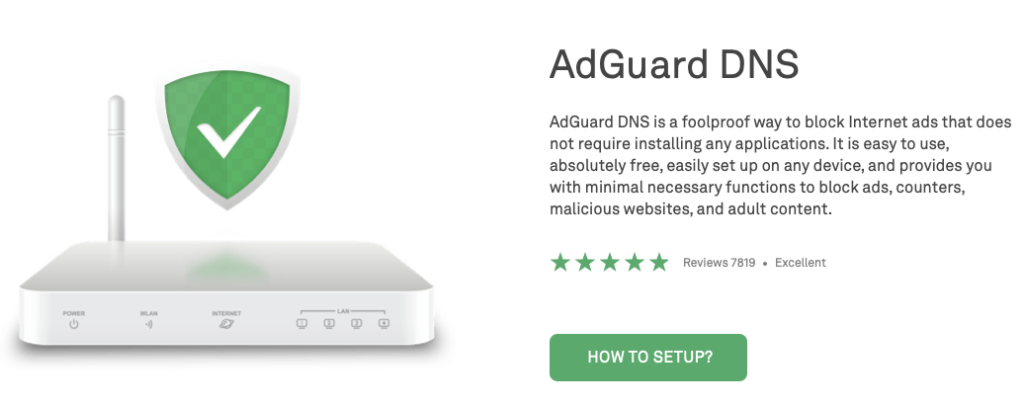
DNS level ad blockers are services which block well known ad serving domains and tracking services at the DNS level. So when you punch in BuyMyOldMac.com, some elements are just outright nixed before they even hit your web browser, saving your ancient Mac’s precious processing power. It’s damn fine stuff.
There are a couple of routes to go to set up this kind of ad blocking, using services like AdGuard DNS or NextDNS. (Right now, I’m using AdGuard DNS but I’m considering switching to NextDNS in the future.)
The easiest way is to switch over your router or your computer’s DNS settings with new name servers. AdGuard DNS, for example, has an easy tutorial guide right here. It takes all of 2-3 minutes to see the instant impact this service can have. Many of you probably have already experimented with alternate DNS servers for your home network to get more responsive web browsing as is, as your ISP’s options are often not optimized and more frequently slow.
Another option is to run your own internal server, using software like AdGuard Home or Pihole on a Raspberry Pi. It’s relatively easy to set up, if you have a Raspberry Pi. Once installed and configured, you just point your router’s DNS settings to that internal server, and you get complete control. Check out the AdGuard Home info here (as it is does a little more than Pihole) to get a feel for its many features and how doable it will be for your tech level to get running.
Still, there is a downside to running your own internal server. If it freezes up (as Raspberry Pis are known to do), your whole network will likely be unreachable if you are on a trip and trying to remote in to get a crucial file. I know this from experience.
Let me know if you use AdGuard, Pihole, NextDNS, or another service.