Lubuntu-Remix

If you are looking to extend the life of your G4 or G5 PowerPC machine, open source software is a valuable tool for interesting software packages that can provide better security and breath some life into our aging computers.

One of the Linux variants that is available for PowerPC Macs is Lubuntu-Remix.

You won’t find this one on the official Lubuntu pages, because it is maintained by “wicknix” over on the MacRumors forum. He provides a few different versions, including one that is based off of Ubuntu 16 and works better on G5s. The one I have been utilizing to test some things out is MacBuntu, based off of Ubuntu 12 but with some newer software packages and more modern web browser options. Oh, and a shiny little bit of Mac friendliness like a faux Dock.

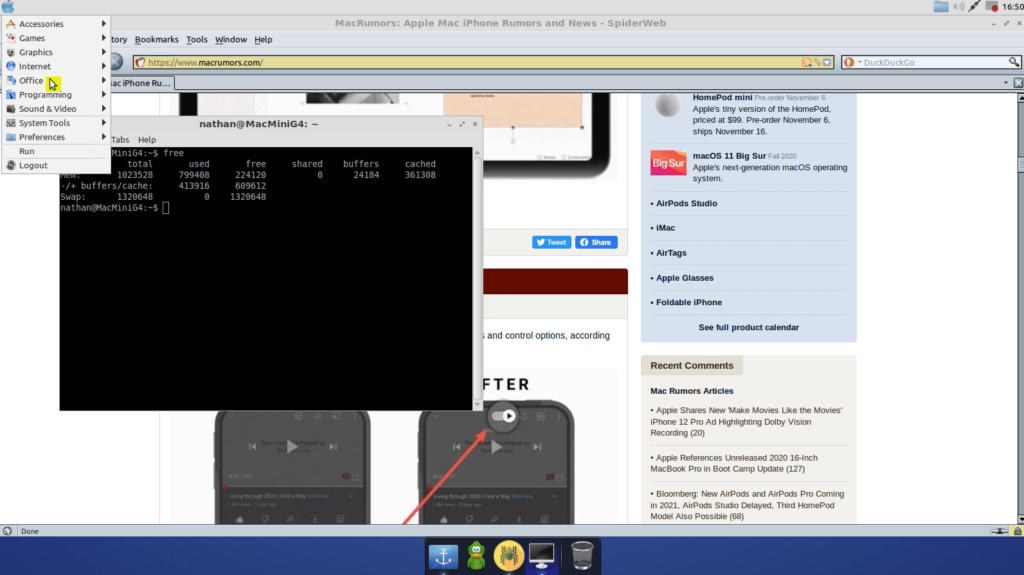
As you can see from the screenshot, MacBuntu is functional and provides some nice software options right out of the box (including ArcticFox pictured above). You will need to pay attention to your boot options, as Linux on PowerPC machines often requires making some adjustments to the boot string to make the GPUs function correctly. Without doing so, the system will likely lock up. There are helpful guides in the thread, and wicknix does a great job answering questions from newbies.

In the screenshot above, I am running MacBuntu on an old Mac mini G4. It doesn’t take too long to boot into the desktop, and it is decently responsive. You can browse the web, although webpages are fairly slow to load. Using terminal is of course nice. I also enable a vnc server, so I can remotely log in and tinker with it a bit. Ultimately, it works, and it’s something nice to mess with on a machine that is old and is limited to 1GB of RAM. Keep all that in mind as you tinker with it.

The other challenge is figuring out ways to load the OS in the first place since using a CD/DVD is likely the friendliest solution, but in my case and many others, the old slot loading CD/DVD drives in these PowerPC machines have reached the end of their life. I ended up just pulling mine out, so I was able to get the G4 to boot off a flash drive. It took some trial and error though.

I won’t say that it is as pleasant to use or speedy as a Leopard or Tiger install. It certainly isn’t as fast as OS 9 (which you can install on these old G4s). But since some of the software is newer, it is a nice alternative to throw in the mix and tinker with.

Pro Tip: DNS Ad Blocking

AdGuard DNS is your friend.

As our old PowerPC machines age, especially our G5s, browsing the internet is still possible because Cameron Kaiser is a gift. Kaiser in turn single-handedly dives into reams of code to keep TenFourFox updated and lively, including new features like “sticky reader mode“.

Ads and tracking stuff definitely slow down web browsing for all PCs, so more and more people have switched to using their browser’s built-in ad blocking systems or plugins like Wipr or uBlock. (Cameron has directly embedded an ad blocker on TenFourFox, which does help pages load quicker.) But the good news is there are alternatives that reduce the rendering load on our old Macs.

DNS level ad blockers are services which block well known ad serving domains and tracking services at the DNS level. So when you punch in BuyMyOldMac.com, some elements are just outright nixed before they even hit your web browser, saving your ancient Mac’s precious processing power. It’s damn fine stuff.

There are a couple of routes to go to set up this kind of ad blocking, using services like AdGuard DNS or NextDNS. (Right now, I’m using AdGuard DNS but I’m considering switching to NextDNS in the future.)

The easiest way is to switch over your router or your computer’s DNS settings with new name servers. AdGuard DNS, for example, has an easy tutorial guide right here. It takes all of 2-3 minutes to see the instant impact this service can have. Many of you probably have already experimented with alternate DNS servers for your home network to get more responsive web browsing as is, as your ISP’s options are often not optimized and more frequently slow.

Another option is to run your own internal server, using software like AdGuard Home or Pihole on a Raspberry Pi. It’s relatively easy to set up, if you have a Raspberry Pi. Once installed and configured, you just point your router’s DNS settings to that internal server, and you get complete control. Check out the AdGuard Home info here (as it is does a little more than Pihole) to get a feel for its many features and how doable it will be for your tech level to get running.

Still, there is a downside to running your own internal server. If it freezes up (as Raspberry Pis are known to do), your whole network will likely be unreachable if you are on a trip and trying to remote in to get a crucial file. I know this from experience.

Let me know if you use AdGuard, Pihole, NextDNS, or another service.

— Nathan

System 7 Extension MEGATHREAD

First, for those looking for G5 content, it’s coming. I still am working on a review of a Lubuntu Remix that I’ve been tinkering with as an alternative OS. But for now, since I’ve been developing my skills recapping old motherboards and getting some vintage Macs working, that’s the focus.

Which brings me to this MEGATHREAD – what System 7 extensions/control panels do you recommend?

Here are a few that I love to make life a little easier on System 7.

StickyClick is rad. It makes menus sticky like in OS 8 and beyond, and without it, you feel kind of weird getting use out of these old computers.

SpeedDoubler 8 is helpful to speed up file transfers.

RamDoubler could be helpful too, but I’ve never truly trusted it and think it does slow down your ancient Mac a little.

Helium gets rid of that stinking help balloon on the menu bar. Simple and cutthroat.

Option-Tab Program Switcher brings Mac OS X functionality to System 7. So cool.

Thread Manager is helpful for some programs you will use.

Snitch extends the Finder in some interesting ways.

Windows is an interesting little control panel that adds an extra “Windows” menu to the menu bar for every app, giving you some ability to manage your… windows… a bit easier.

That’s enough for now. What do you recommend? Any hard to find ones that make System 6/7/8 better?

— Nathan

AppleTalk on your Synology NAS

A few years ago, I picked up a Synology NAS for network backups here in the ol’ home.

My model (a DiskStation DS218j) in particular was on sale. It has space for two internal desktop SATA hard drives and runs them in RAID1, so the two hard drives mirror each’s data. Ideally, if you had a hardware failure, one drive is still good, and data is not lost.

The NAS has a mature and stable interface accessible through a website as well as ssh. It has a lot of different features, including setting up your own Dropbox-clone, internal mail servers, development environments, and even web hosting. Most users will want it just for the backup options, and it’s plenty fast over the local network doing Time Machine. You can even expand its capabilities through community packages that add functionality and cool software. All in all, my model is a fairly inexpensive entry level model one, and there are others that are more expensive and have more drive capacity.

One feature that it has is AppleTalk, running a newer version of Netatalk (~3.3). Netatalk is an open source implementation of the AppleTalk protocol that can help bridge networking divides among older and newer Macs. While it was fairly easy to turn on AppleTalk, it took a little bit more work to get the thing doing what I wanted to do.

For one, I prefer guest access (internally again) to make it less painful for older Macs to connect and share files. I don’t necessarily want to create different users for each vintage Mac and have to memorize a different set of passwords. You can apparently do this on the Synology, creating individual home folders for each vintage Mac. That’s overkill for me.

I want a folder to share vintage MacOS software and updates to make it easier to save files and upgrade old machines.

So, in addition to making sure AppleTalk was enabled under File Services in the main Control Panel, I also had to do three things, two of which you probably shouldn’t do.

First, I made sure to utilize Advanced Permissions under the Folder Sharing options for the particular folder I wanted to share with the Macs. This makes sure I could enable guest access, so my vintage Macs don’t need to enter any passwords.

Second, I needed to enable the guest account. It comes with a password for security purposes, which makes sense, but I didn’t want a password.

So, I did the third thing. Under Users -> Advanced, you can check off enforcing password rules which lets anyone have an account without a password. You shouldn’t do this really, but since this is only internally accessed, it’s fine for me.

Now, I can access, at least initially, a shared folder from a Performa 5215CD on OS 8.1 and an iMac G4 running OS 9.2.2.

However, to get it working on my Color Classic, which I hope to recap soon, I had to get the system software up to 7.5.3 and then move the “AppleShare” file from the AppleShare client 3.7.4 into the Extensions folder. (Being away from System 7 so long, I forgot how kind of painful it was to do updates back in the day.) The weird quirk was that AppleShare client would not install, so I just manually copied the file. At that point, with Open Transport 1.1.2 also installed, it gave me an option to connect to an IP address for AppleTalk in Chooser. The Synology does not automatically show up. I may explore that quirk later, but I hear it’s not possible in later versions of netatalk.

Anyway, at least for now, with OS 7.5.3 and up, I can share files among ancient and newer Macs.

Cool, right?

— Nathan

Restoring an (ancient) Simple Touch Nook

Now for a quick digression, because I love getting more use out of old tech.

Years ago, I picked up a Simple Touch Nook e-reader, a competitor/alternative to the Amazon kindle, for under $20 refurbished. Barnes & Noble, I believe, have gone through bankruptcies and changes since then so these older devices have been mostly abandoned in favor of newer options. While I could get it to connect to wifi, the Setup process cannot connect to the Nook servers for some reason (probably because they do not exist any longer). Other than that though, the device works and has a solid e-ink screen and included Adobe technology.

If you happen to find one for nothing and want a way to read some e-books, follow the guide from this webpage to skip registration. You can then easily side load ebooks onto a microSD card loaded into the slot on the side. Just drag files into the Books subfolder. I believe the reader will even view PDFs, albeit in gray scale.

Here are the steps from the website. They worked for me.

Hold down the top right button on the front of the device and slide your finger from left to right across the top of the E Ink screen. (It’s a little hard to see, but it’s the Nook’s default next page button if you were using your right hand. For past Kindle owners, it’s the one in the same spot as the previous page button on a Kindle.)

Turn on the device, but do NOT start setting it up. B&N devilishly waits until the last step to ask you to create an account, at which point the following instructions don’t work. If you do start setting it up, just turn it off and back on again.

A ‘Factory’ button should appear in the top left corner of the screen. Press it.

Once in the Factory menu, hold down the top right button on the front of the device and tap the bottom right corner of the screen.

You should now see a ‘Skip Oobe’ button. Tap that and the Nook should finally load the home screen.

My son now has his own simple e-reader, and I’ve gotten more use out of old tech. Many classic novels are online free, like Call of the Wild and Huck Finn. And we didn’t feed the Amazon beast. Good stuff.

— Nathan